
Fairy Designs Tutorials-2014
This tutorial is my own creation and written by me Nov,3 2014. Any resemblance to others is purely coincidental.
This tutorial was written for those with a working knowledge of PSP.
Please do not copy or claim as your own.
Please do not copy or claim as your own.
Anything you produce from this tutorial is yours to do what
you wish for personal use only. No profit is to be made from your results.
Materials Needed:
PSP X3 or any version should work.
Tube of choice. I am using the beautiful art of Melissa Dawn.
You can get her art at Creative Design Outlet.
You must have a license to use her art.
Scrap Kit ScrapBCS_IB-MelissaDawn-22-2 by Babycakes Scraps.
Kit can be purchased at Creative Design Outlet.
Mask of choice. I am using DD_WinterMask_9
from Dangerously Delicious Desingz.
Template kandeechristmas-2012-2 fromDangerously Delicious Desingz.
It can be found under Zipped Templates Old Christmas Templates.
Either a silver gradient or silver image.
Font of choice. I am using Dobkin Script.
Eye Candy 4000 - Gradient Glow - for text.
Lets begin.
Open the template - duplicate - close original.
Delete the first 8 layers and the red rectangle layer.
Highlight the red circle layer.
Select all - float - defloat - invert.
Open paper 1 - resize 60% - copy - paste as new layer.
Position in the circle - hit delete on the keyboard.
Select none.
Delete the original layer.
Highlight the green strip layer.
Select as before.
Open paper 4 - resize 75% - copy - paste as new layer.
Position just the blue in the strip.
Hit delete on the keyboard.
Select none.
Delete the original layer.
Highlight the white framed rectangle layer.
Click inside with the magic wand - modify - expand 2 - add a new raster layer - move under frame layer.
Open paper 3 - copy - paste into selection.
Select none.
Highlight the green rectangle layer.
Select as before.
Open paper 2 - resize 60% - copy - paste as new layer.
Hit delete on the keyboard.
Select none.
Delete the original layer.
Highlight the green square.
Select as before.
Open paper 5 - resize 40% - copy - paste as new layer.
Position in the square - hit delete on the keyboard.
Select none.
Delete the original layer.
Highlight the red square.
Select as before.
Open paper 2 - resize 60% - copy - paste as new layer.
Position so that the top left had corner of the paper is at the top left corner of the frame - hit delete on the keyboard.
Rename square layer. You will need this for later.
Open your tube - resize as needed - copy - paste as new layer.
Position in frame - hit delete on the keyboard.
Apply a drop shadow of choice.
Select none.
Delete original layer.
Make you foreground your silver.
Highlight gold frame.
Add a new raster layer - fill with you silver.
Do the same for the gold strip and gold circle.
Highlight the top layer.
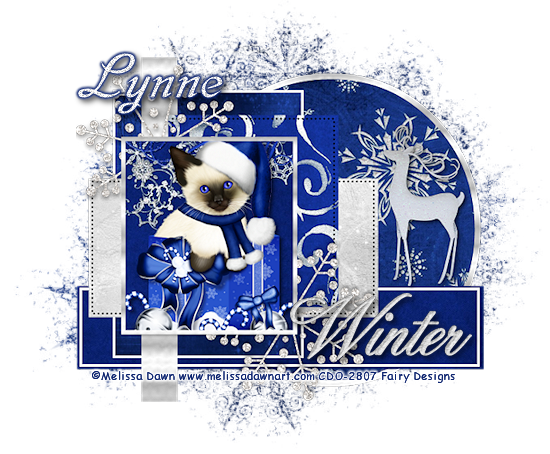
See my tag for placement of elements.
Open element 27 - copy - paste as new layer.
Move under the square layer.
Duplicate - image - flip.
Open element 25 - resize 45% - image - mirror - copy - paste as new layer.
Close the bg layer.
Highlight the top layer - merge visible.
Resize 80%.
Add a new raster - move on top of the bg layer.
Select all.
Open paper 3 - copy - paste into selection.
Apply mask - merge group.
Crop - resize to your liking. Be sure to sharpen the merged tag layer.
Open element 6 - resize 50% - copy - paste as new layer - duplicate - merge down - apply drop shadow of choice.
Tube of choice. I am using the beautiful art of Melissa Dawn.
You can get her art at Creative Design Outlet.
You must have a license to use her art.
Scrap Kit ScrapBCS_IB-MelissaDawn-22-2 by Babycakes Scraps.
Kit can be purchased at Creative Design Outlet.
Mask of choice. I am using DD_WinterMask_9
from Dangerously Delicious Desingz.
Template kandeechristmas-2012-2 fromDangerously Delicious Desingz.
It can be found under Zipped Templates Old Christmas Templates.
Either a silver gradient or silver image.
Font of choice. I am using Dobkin Script.
Eye Candy 4000 - Gradient Glow - for text.
Lets begin.
Open the template - duplicate - close original.
Delete the first 8 layers and the red rectangle layer.
Highlight the red circle layer.
Select all - float - defloat - invert.
Open paper 1 - resize 60% - copy - paste as new layer.
Position in the circle - hit delete on the keyboard.
Select none.
Delete the original layer.
Highlight the green strip layer.
Select as before.
Open paper 4 - resize 75% - copy - paste as new layer.
Position just the blue in the strip.
Hit delete on the keyboard.
Select none.
Delete the original layer.
Highlight the white framed rectangle layer.
Click inside with the magic wand - modify - expand 2 - add a new raster layer - move under frame layer.
Open paper 3 - copy - paste into selection.
Select none.
Highlight the green rectangle layer.
Select as before.
Open paper 2 - resize 60% - copy - paste as new layer.
Hit delete on the keyboard.
Select none.
Delete the original layer.
Highlight the green square.
Select as before.
Open paper 5 - resize 40% - copy - paste as new layer.
Position in the square - hit delete on the keyboard.
Select none.
Delete the original layer.
Highlight the red square.
Select as before.
Open paper 2 - resize 60% - copy - paste as new layer.
Position so that the top left had corner of the paper is at the top left corner of the frame - hit delete on the keyboard.
Rename square layer. You will need this for later.
Open your tube - resize as needed - copy - paste as new layer.
Position in frame - hit delete on the keyboard.
Apply a drop shadow of choice.
Select none.
Delete original layer.
Make you foreground your silver.
Highlight gold frame.
Add a new raster layer - fill with you silver.
Do the same for the gold strip and gold circle.
Highlight the top layer.
See my tag for placement of elements.
Open element 27 - copy - paste as new layer.
Move under the square layer.
Duplicate - image - flip.
Open element 25 - resize 45% - image - mirror - copy - paste as new layer.
Close the bg layer.
Highlight the top layer - merge visible.
Resize 80%.
Add a new raster - move on top of the bg layer.
Select all.
Open paper 3 - copy - paste into selection.
Apply mask - merge group.
Crop - resize to your liking. Be sure to sharpen the merged tag layer.
Open element 6 - resize 50% - copy - paste as new layer - duplicate - merge down - apply drop shadow of choice.
Add © copyright information and license number.
Add what ever name that you would like.
Thank you for trying my tut and I hope that you enjoyed it. Don't forget to send me your results so that I may display them in my show off gallery.
Hugs♥Terisa
No comments:
Post a Comment