

©Fairy Designs Tutorials-2014
This tutorial is my own creation and written by me January 6, 2014. Any resemblance to others is purely coincidental.
This tutorial was written for those with a working knowledge of PSP. Please do not
copy or claim as your own. Anything you produce from this tutorial is yours to do what
you wish for personal use only. No profit is to be made from your results.
Materials Needed:
PSP X3 or any version should work.
Tube of choice. I am using the awesome art of Anna Marine.
You can purchase it at Creative Design Outlet.
You must have a license to use this art.
Preset shape SkTags 08 found HERE
Mask 387InsatiableDreams from Insatiable Dreams HERE
Filters FM Tiles - Blend Emboss
Flaming Pear - Super Blade Pro
MuRa's Meisters - Cloud
Lets begin.
Put your preset shape in you psp files.
Open a new 600x600 transparent image.
Foreground color set to white and background set to null.
Using you preset shape tool set to SK Tags 08

Draw out a large shape. I started in the upper left corner with x0 y0 and drew out to x 314 y499.
Objects - Align - Center in Canvas.
Convert to raster layer.
Apply a inner bevel
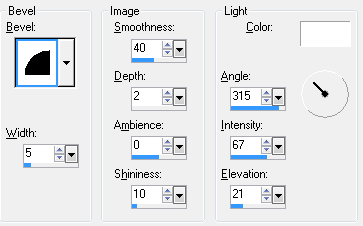
Apply Super Blade Pro using any silver you like. I used the the ice.q5q that comes with the filter and the default setting.
Duplicate - resize 90% - merge down.
Rename this layer frame.
Click inside between the frames with you magic wand tool - modify - expand - 2.

Make a foregound gradient using a dark and light color.
Add a new raster layer - send to bottom - fill with the gradient - keep selected.
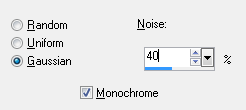
Adjust - add/remove nosie - add nosie.
Effects - Artistic Effect - Balls and Bubbles - with the following settings. - Keep
Selected

Apply - Effects - FM Tiles - Blend Emboss at the default settings.
Select none.
Highlight the frame layer and using the magic wand again click inside the frame - modify - expand -2.
Add a new layer and move below the frame layer.
Apply MuRa's Meisters - cloud - default.
Effects - add/remove noise - add noise - using same settings as before only change to 6.
Add a new layer - open your tube - resize if needed - copy - paste into selection - select none.
Apply a drop shadow of choice to your tube.
Add a new layer - send to bottom - fill with a color from your tube - apply the mask - merge group.
Now you will need to use your pick tool and push in the sides of your mask and pull the top up a bit till you like it.
Merge - Visible Crop Resize 500 pixels on the longest side. Sharpen
Add © copyright information, license number and any text or name you want. Save as transparent png.
.
Thank you for trying my tut and I hope that you enjoyed it. Don't forget to send me your results so that I may display them in the Show off Gallery.
Hugs♥Terisa
No comments:
Post a Comment